💡 DIY Computer Fixes?
Grab my easy step-by-step guide and keep your computer running like new.
Windows 10 very slow and unresponsive 2023

When Windows 10 or Windows 11 becomes very slow and unresponsive make it faster in 2023
- Windows 10 can become very slow or become unresponsive altogether after an update. This can also happen if you have installed a 3rd party antivirus which is not recommended.
- Too many running apps use all available RAM, causing Windows to slow, but there are workarounds.
- Check the event log for any hardware or driver-related errors, and try to resolve any issues indicated.
- There are a many possible solutions that anyone can try, so keep reading to find the best possible solutions.
How to Clean up the computer and make Windows 10 run faster
One of the simplest ways to do this is to disable the processes you don’t need. This will make leave more resources to other apps thus making the PC faster.
This is just one method you can use, and we wrote in-depth on how to speed up Windows and make it lightning-fast in one of our previous guides.
If Windows 11 is slow and unresponsive, be sure to check our guide on how to make Windows 11 faster and fix the performance issues for good.
What can I do if Windows 10 is too slow?
Update your drivers and software
Windows 10 can become very slow if your essential components or applications are out of date. A computer cannot handle video cards, computer programs, sound cards, or other hardware, they must be managed by a driver.
You can easily upgrade drivers, however, it takes a long time to find the appropriate suitable drivers to improve Windows 10’s slowness and responsiveness.
While updating applications is easy, outdated drivers can be problematic if you don’t know what to download.
3. Enable a
faster startup option
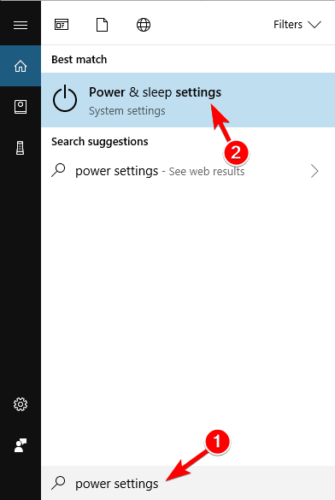
- Press Windows Key + S and enter power settings. Select Power & sleep settings.
- Click Additional power settings.
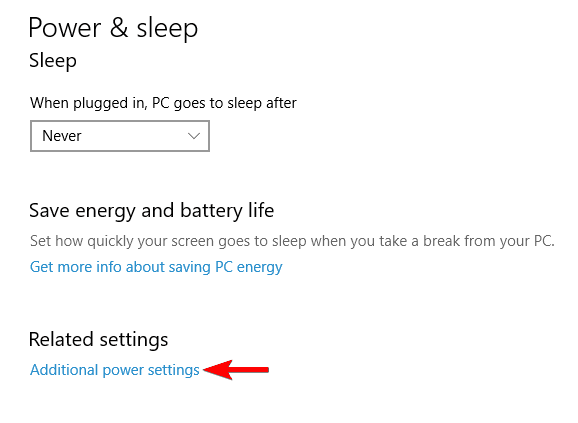
- Click on Choose what the power button does from the menu on left.
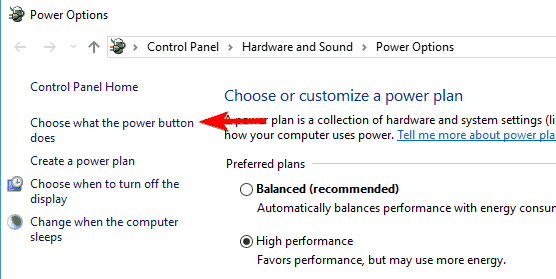
- Now select Change settings that are currently unavailable.
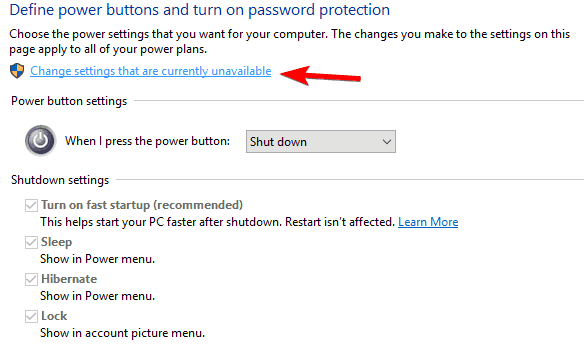
- Make sure to check Turn on fast startup (recommended).
- Save your changes and you’re good to go.
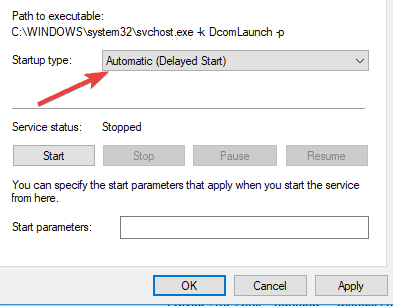
4. Check for slow services
6. Use a cleaning tool
Excessive unnecessary data can cause hard drive fragmentation, affecting overall system performance. Cleaner applications come in handy here.
You can simply erase useless data from your PC with a few clicks, and CCleaner performs great work cleaning it.
CCleaner is a PC cleaning and maintenance utility. Its major function is to locate and eliminate undesirable files from your computer, allowing your system to run quicker and more efficiently.
It also frees up extra space on your system’s hard disk by deleting unwanted files.
7. Perform a clean Windows 10 install
Sometimes there are software issues when you upgrade from Windows 8 or Windows 7 to Windows 10, or even when installing the latest Windows 10 updates.
So it’s advised that you perform a clean install of Windows 10. Just be sure that you backup your important files before doing this.
9. Disconnect all peripherals
Sometimes your hardware can cause Windows 10 to become slow. To fix that problem, you need to disconnect all peripherals from your PC.
This includes all USB devices, such as printers, hard drives, cameras, etc.
For instance, several users reported that the issue was caused by USB speakers. After disconnecting the device, the issue was completely resolved.
10. Defragment your drive
- Press Windows Key + S and enter defrag. Now choose Defragment and Optimize Drives.
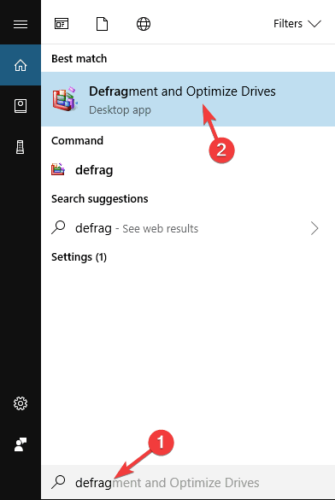
- When Optimize Drives window opens, select the desired drive and click on Analyze.

- After scanning the drives, select the fragmented drive and click on Optimize.
- Wait while Windows defragments your drive.
- Repeat this process for all your drives.
Once the defragmentation process is finished, check if the problem is resolved.
It’s worth mentioning that there are many other great third-party defragmentation tools that offer various advanced features.
11. Adjust the size of the virtual memory
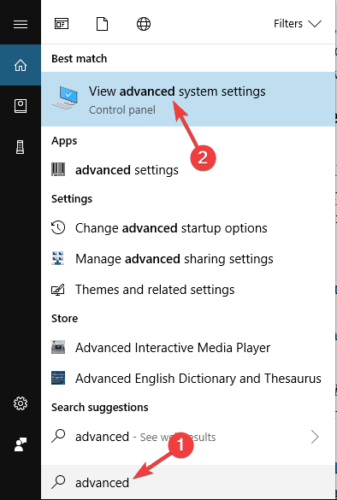
- Press Windows Key + S and enter advanced. Select View advanced system settings.
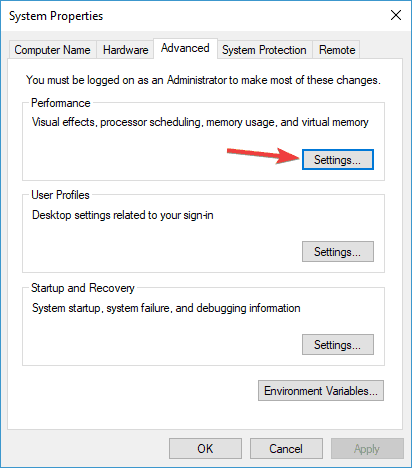
- Click the Settings button in the Performance section.
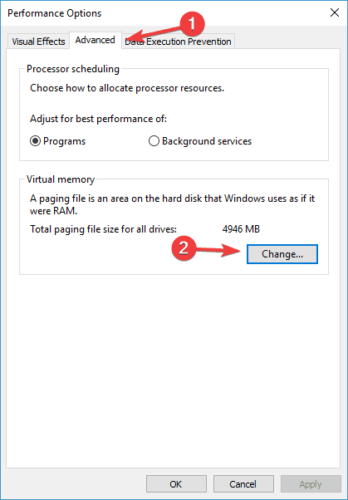
- Go to the Advanced tab and click on Change button.
- In the Virtual Memory window, uncheck Automatically manage paging file size for all drives.
- Then, select the Custom size, and enter Initial Size and Maximum size. Now click on the Set button and OK to save changes.
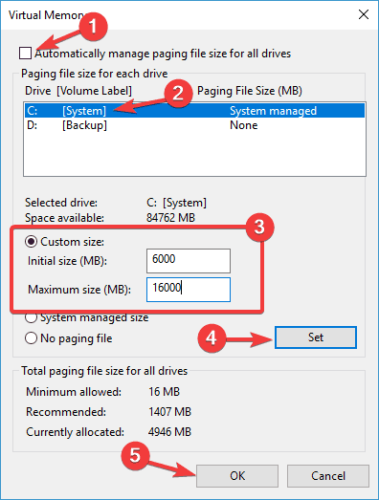
After doing that, you’ll set the size of virtual memory for that drive. You might have to set the manual size for all your drives.
As for the size, the size of your virtual memory is related to the size of your RAM.
As a general rule, the Initial size should be at least 1.5 times larger than the amount of RAM memory on your PC. As for Maximum size, it should be up to 4 times larger than the amount of RAM on your PC.
12. Check for viruses
Just like any other software, Windows 10 is vulnerable to viruses, so make sure that your system is clean. You can use any free antivirus software and do a full system scan just to be sure.
We believe that after trying out these solutions, any slowdown problem should be completely resolved.
We’ve got a similar troubleshooting article, dedicated to slow desktops that you might want to check out.
7. Perform a clean Windows 10 install
Sometimes there are software issues when you upgrade from Windows 8 or Windows 7 to Windows 10, or even when installing the latest Windows 10 updates.
So it’s advised that you perform a clean install of Windows 10. Just be sure that you backup your important files before doing this.
When You Need Help
That Tech Jeff can help you with your computer no matter where you live! Get online computer help or computer tutoring no matter where you live. Just read the more than 800 five-star reviews. (thumbtack and google combined)
That Tech Jeff has 26 years experience and has offered computer help online since 2007. Before you head to Geek Squad get That Tech Jeff’s advice. Its free.
Affordable and honest FLAT RATE online help – no hourly charge.
You pay just one price if your problems are fixed and nothing if not.
Patient online computer tutoring also available by appointment.


